35 Weeks of “Pinteresting” Baking: Week 4 – Mini Bananas Foster Cheesecakes

O.k., I may have bitten off more than I can chew with this challenge.  Between my work schedule, my kids, and still needing to cook regular meals, throwing in a weekly baking session has proved to be…well a bit daunting.  Nevertheless I shall move forward, power through, and fight the good fight.

I had been eyeballing this particular treat for quite some time now.  It was a newer “pin” and it is at the top of my board.  Aside from the recipe’s image staring right at me every time I open my board, cheesecake just so happens to be my favorite dessert.  The banana part wasn’t as appealing, but seeing as how I end up having a constant need to Google “what to do with your over ripe bananas”, it fit the bill.

Cheesecake recipes are usually pretty standard. Crush Graham crackers and mix with melted butter to create your crust.  A food processor is absolutely best for this especially if you add nuts.  It should look like beautiful, delicious, sweet smelling sand when you are finished.

IMG_8057

Next you usually mix cream cheese and sugar (and you’ll usually find cheesecake recipes use a smaller amount of sugar than typical desserts) and then add eggs.  It’s pretty simple and basic, but for the first time I used brown sugar as the recipe requires and man oh man did it ever make a beautiful color.  I could have just used it  as a spread right then and there.  The next unique aspect of this recipe was adding mashed bananas at the end.

IMG_8065IMG_8066

For the entire recipe, I used generic store bought products.  I actually had some cream cheese in the fridge awaiting their transformation.  Since I do consider myself a cheesecake veteran, I did decide to do a tiny bit of freestyling.  Since I am a crustinista (oh yes, yes I did go there), I wanted to add a little more flavor to the Graham cracker crust by adding about a tablespoon of brown sugar and 1/2 tsp of vanilla.

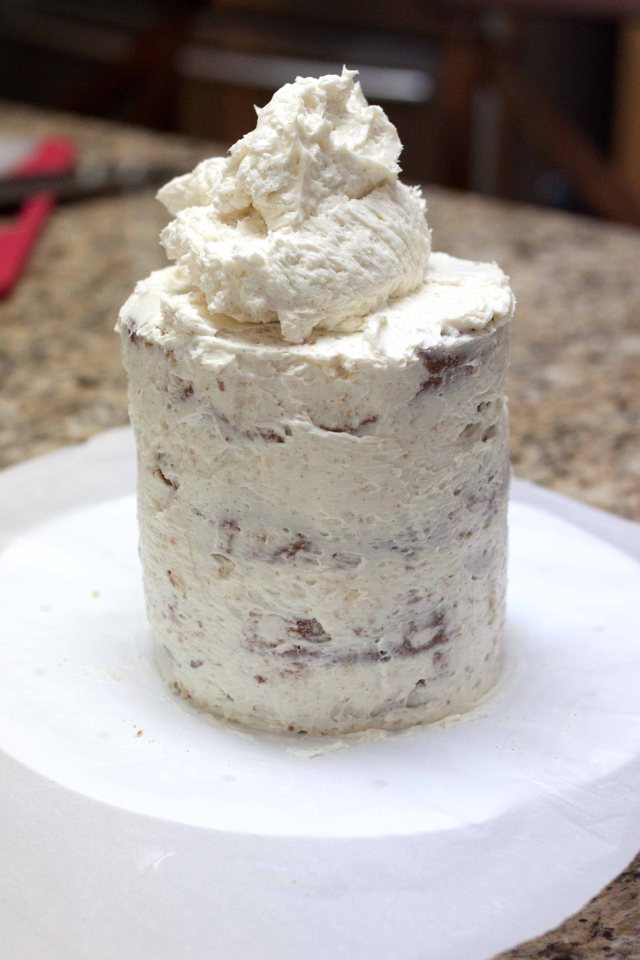
It is so critical when baking cheesecake, that you have either a springform pan or this cute mini cheesecake pan (like the one seen below).  I used to make them in muffin pans and it added so much work, but it is manageable if you do not have the actual pan.  If you plan to make mini cheesecakes often, it is well worth the investment.

IMG_8050

One little poke of the finger and you have a super cutesy dessert.  It also shapes better than out of the muffin tin.

IMG_8098

To prepare the pan for it’s special task of creating this rich dessert, is the spray each well with cooking spray.  You then, scoop the sand-like crust into each well.  I must say, I had to add more than the 2 T of butter which the recipe required.  The crust should start sticking together when compressed otherwise you would not have a formed crust, but rather a Graham cracker crumble sloughing off when you take out your cheesecake.  To add the filling, I like to use a container with a spout for pouring.  This time around I chose a measure cup, worked like a charm.  I actually ended up making 16 mini cheesecakes instead of the 12 the recipe noted.

IMG_8071

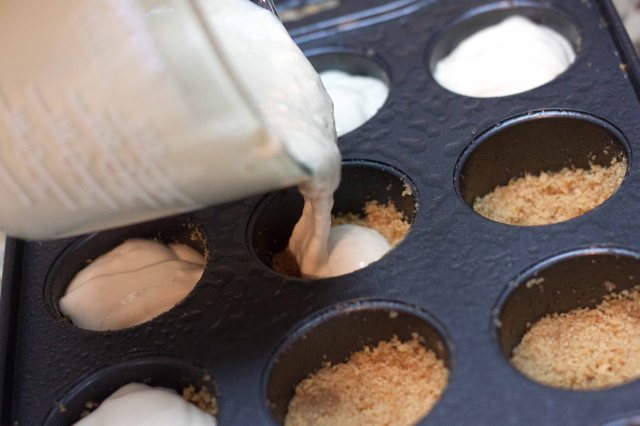
Some of my cakes cooked a little bit long or my oven was too hot. Also, some of the cakes sunk in due to uneven baking.  The only way I have ever learned to have cheesecake cook evenly is to submerge part of the baking container in water while in the oven.  Yesterday was not the day for that so I just placed the pans directly on the oven rack.

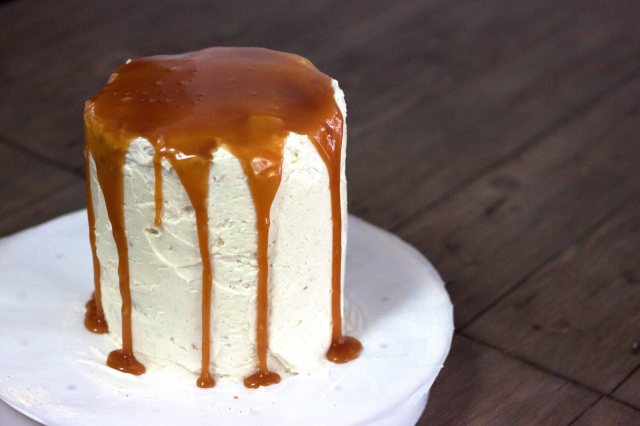
For the sauce, well that begin very interestingly.  The butter melting went perfectly according to plan.  I mean, it’s melting butter in a pan.  I then added the brown sugar and started to wonder after a minute why it did not look smooth like the recipe had indicated.  At this point I am cursing silently in my head as my kids were nearby.

IMG_8082

IMG_8086

It looked anything but smooth.  I started looking grainy and when I mixed it, well it was just strange so I decided adding the liquid now might help.

I did not have rum and I was going to give some to my kids so I added 1 T of vanilla instead.  Steam, hiss, splat….I had a boiling science experiment on my hands.

IMG_8085

At this point, there was no turning back, I was not about to start over so I just threw in the sliced bananas.  It didn’t seem very clear in the recipe but for this part you can use a regular banana as it will be cooked to perfection.

After a few whirls, my sauce finally looked thin and glassy like the picture from the original recipe blog.  The take home here is that it takes a while to get to that thin, smooth, glossy texture.  I always feel like recipes frequently fail to mention how long some foods take to transition to its new elevated state.

IMG_8089

Like caramelizing onions!  OMG it takes like hours or something crazy and recipe wording, to me, seems to indicate it happens just like that.  Anyway, by the end of what seemed to be an episode from Bill Nye the Science Guy, my “Foster” turned out beautiful…and so did the cheesecakes.

IMG_8114

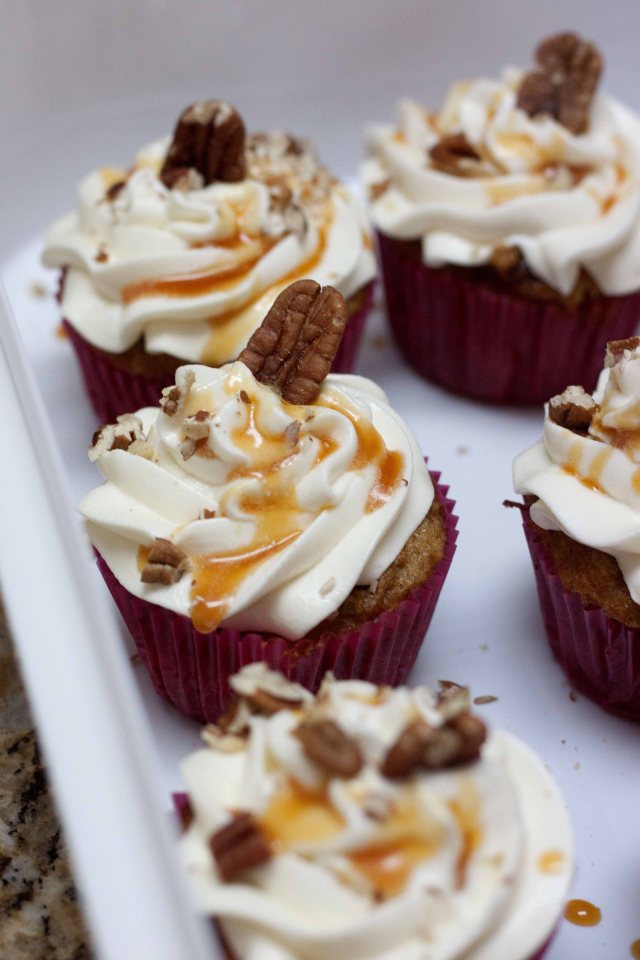
Ooh, they looked so cute!  My favorite part was the light mocha-like coloring of the cheesecake.  I have only made white cheesecake in the past so that was a treat.  It was quite good and got rave reviews from my neighbor and her family, but as I mentioned before, I am not the biggest banana dessert fan.  I will say, if you are a fan of banana flavored desserts, this will knock your socks off!  You will want to herald in the streets about this wonderful treat you discovered.  It is rich and creamy and the brown sugary banana on top is icing on the….cheesecake.

IMG_8123


35 Weeks of “Pinteresting” Baking: Week 3 – The Deceptively Not So Simple Soft Lofthouse Style Frosted Cookies

O.k., you can totally call me on it.  I made these ones earlier in the week for the sole purpose of making sure I get the post out on time and, well, life happened.  So  here I am in Week 4, writing about my Week 3 conquest.

On  Thursday I was in the store scrolling through my board on the phone.  I was extra exhausted from work  and not in the mood to tackle anything major.  A few swipes in and I found them, simple copy cat Lofthouse sugar cookies.  These are the guiltiest of guilty pleasures of my husband and I.  They are so soft and the frosting is so rich and the recipe (ingredients) seemed so easy….seemed is the operative word here.

I got home later in the evening and went over the steps of the recipe and wanted to cry.  There was dough rolling and chilling overnight and more dough rolling and cutting. Ugh, I was so mad.  But if anyone knows me, I am committed.  I followed that recipe in my zombie state, threw them in the fridge and fell out.

At around 4:50 am the next morning, I started phase 2, The Roll Out.  I got my favorite, handy dandy roller and got to work.  Now, I will be the first to confess I have yet to master the art of rolling out anything.  I think I need a ruler because not matter how much my eyes convince my brain I have reached the appropriate thickness, I end up with double the volume once baking is complete.  As far as cutting out my cookies,  I have every cookie cutter possible except for a simple circle so I used my go to back up….a  drinking glass.  It does the trick to perfection and you don’t have to spend any extra money.

I threw those puppies in the oven and got to work on the frosting.  Now, I know I said I would stay away from buttercream frosting (and that is where it is solely butter), but this time I figured it wouldn’t be so bad being on a cookie and I was correct.  I don’t know if it was the heavy cream or what, but I was soooooooo delicious.  Anyway, wham bam thank you ma’am, the cookies were packed up and ready to be hauled off with me to work.  They came out cute, but the flavor was o.k.  I think the frosting saved the cookie as it tasted more dough like than that who-knows-what’s-in-it Lofthouse cookie you get from the store.  It only matched up with the store bought version by appearance and texture to some extent.

IMG_7912

I’m now going to pull a screenwriter move and go back to the beginning.  Imagine a tape playing back at full speed.  The recipe called for low fat sour cream, I opted for full fat.  This is not because I am some fancy baker that wanted a different flavoring, that is just what I had in the fridge.

I also opted to use the extra amount of flour that is directed to use as needed to flour my rolling surface.  I thought I was so fancy and graduating to a real baker coming up with my own plan.  It really didn’t work.  It was so sticky.  I also just did a dab of orange food coloring because food coloring freaks me out and I think I am going to have to suck it up and pay for the natural mixes they offer online.

For some tips:

IMG_7892

  1.  The absolute best rolling pin, in my humble opinion, are the solid wood pieces.  The ones with the handles that are on a type of roller can break under pressure (I promise I’m not heavy handed) and the full wood ones look nicer.IMG_7901
  2. Whenever possible and o.k., use parchment paper.  It allows you to just keep it moving with several batches.  Just pull the paper (with cookie) off the pan and you’re ready to start your next batch.  IMG_7907IMG_7909IMG_7911
  3. A quick way to get a good frosted cookie with the smooth edge is, as always, using a pastry bag.  It made this so much faster for me. (Ugh I just realized this picture is not in focus)
  4. Use an external thermometer in the oven.  I never do this as I do not have one, but I am definitely planning on purchasing one.  The oven definitely become hotter as I continued to bake and cookies were being done way faster than was called for in the recipe.IMG_7882
  5. I know I have said this before, but I don’t think I can stress it enough.  Always crack your eggs in a separate dish.  I use my custard dish because it looks like the cooks/bakers on t.v.  I will not gross you out with the high school Home Ec. class, but let’s just say I was very glad I was in the group that listened and got to eat my chocolate cake.

I guess I can say if I do choose to make this cookie again, I will try another recipe.  I like the look of this cookie and I can imagine doing fun and creative things with it for the holidays, but try it and let me  know if you had better luck.

IMG_7915

35 Weeks of “Pinteresting” Baking: Week 2 – Brown Butter Cake with Vanilla Bean Icing and Salted Caramel

The first thing I have to confess is that, due to my relentless cold, I am behind in posting, but I assure you I am baking in real time.  This cake was made this past Sunday.  I was, once again, able to find inspiration for my baking and this time it was my mother in-law’s birthday.  And what would be more appropriate for a birthday than a cake.  Aside from the gorgeous image of the cake, the words “brown butter” will get me every time.  OMG, I just wiped drool from my mouth.  Brown butter is the process of taking butter to an unimaginable level.  Imagine butter, now image having butter in heaven and you will get a glimpse of what it is to have browned butter.  If you think I am being dramatic, try it.  It attacks all of the major senses involved in eating.  The smell is mind numbing.  It is a cross between roasted nuts and caramel, a smoked caramel if you will.  I also, happen to love the look as well.  It is just a beautiful caramel color and it taste so rich.  As you can see, I can write a post on just browned butter alone, but I digress.  Aside from the naming of this delectable dessert, the beautifully crisp image that I chose to “pin” on my “wall” is what grabbed me initially.  I loved the smooth, seamless frosting underneath the glossy caramel drizzle with tiny little vanilla bean speckles can be seen on the sides of this adorable cylindrical masterpiece. The image below is from the original recipe and the one I chose to “pin”.

cake

The first task at hand was to get the right sized cake pans.  Since I am the absolute worst at visioning size of an object based on a documented measurements, I was shocked when I went to the store and found the four 6″ cake pans.  They were so tiny.  Anyway, I can now I can make cute little cakes so it was all worth it.

If I am being honest, though this was only Week 2, it was already a bit of a flop.  I started off looking good, I promise.

IMG_7777

IMG_7786

As you can see, I masterfully browned the butter (I like to leave in the crust if it will not impact the look) as I have made several recipes with browned butter at this point and I even mentally created an updated version of one of my favorite cookies which I plan to make at the end of the month.  Don’t worry even though it is not part of the 35 week baking, I will still post.  After that, things slowly started to go south, from the forgetting to put in the eggs until after the dry ingredients had been mixed in to the, well, you’ll see later.

Despite the major fails, I do have some tips for this one.

IMG_7794

IMG_7796

IMG_7795

  1.  I am a master at preparing a cake pan.  Though I grew up making boxed cakes with my mom (which is funny because we never ate processed food for meals), I learned how to properly and thoroughly grease a cake pan as if I was making something from scratch.
    • Put shortening on a paper towel and grease the pan ensuring that you cover every inch including the creases
    • Then take a little bit of flour and dump it in the center
    • Work the flour around the cake pan like you are trying to keep a marble from falling off the edge of a tray (I hope that makes sense)
    • Finally rotate the pan like a wheel so that you get the walls of the pan and tap it to remove any excess flour (maybe I will do a video some day).

IMG_7823

Here is the picture of the finished cake out of the pan (above).  Mic drop.

IMG_7847

IMG_7849

  1.  I do know if you are making a layered cake, you level off the top with a knife.  The cake should probably be really cooled at this point so you don’t knock off the edges of the cake like I did.  You are also supposed to  do something similar on the sides, but clearly I went too far.IMG_7845IMG_7846
  2. I saw this online and it worked like a charm.  For the filling layer, use a pastry bag and any circular tip to dispense and then lightly spread it with a flat spatula (any smoothing tool).  That made this step a snap.IMG_7875
  3. Do not, I mean do not substitute vanilla extract for vanilla bean but you can substitute it with vanilla bean paste which is also also quite pricey, but the unlike  billion dollars for the actual bean, it’s a much easier pill to swallow.  The little bean speckles add to the visual charm of the dessert and I believe it is more concentrated as well.  I don’t know, it just has a different flavor that is worth trying.  My husband found this one at Harris Teeter for $10.  But he heard that Trader Joe’s has the same one during the holidays for $4 so be on the lookout for a crazy lady collecting every single tube in November.

Now that is all the tips I am giving because I botched the other tips and ended up mutilating the cake.  Yes, a cake was hurt while filming this process.  But none was wasted!  The kids, my hubby and I gobbled up every little crumb that did not make it to the finale.

There were also a couple of steps I skipped as I was in a rush to get the cake to the birthday girl.  When you initially frost a cake, it is called the “crumb layer”.  Apparently this is a thin layer of frosting that is applied to the cake in order to “catch” the crumbs that magically appear.  This recipe went a step further and had you chill the cake after the crumb layer for 30 minutes.  I think this would have really locked in those crumbs.  This is where I almost lost the cake, again likely due to it not being cooled enough.  I actually started breaking off cake.  After a while I just pretended like I was working on dry wall and the frosting was my caulk.  I actually saved it…well at this step.

IMG_7851

IMG_7852

IMG_7853

Once I added the frosting, it started going south and it took forever just to get this look.  My final thoughts after making this cake are, one, I absolutely do not like butter frosting.  I said butter, not butter cream which has cream cheese in it.  I need more time and practice for making cakes as they are so much work.  I also dare anyone to ever ask me to make a cake because I will karate chop them.  It is so much work and you would have to charge a lot to make it worth it.

It was pretty good, but the most important part is the birthday girl loved it!


Here is the image on my Pinterest wall.

IMG_7860

IMG_7870

See, just like the original.  I bet you can’t tell which one is mine.

35 Weeks of “Pinteresting” Baking: Week 1 – Caramel Pecan Carrot Cupcakes

 Since the very first moment I was sucked into Pinterest, or shall I say suckered, I have been “pinning” (well now it is “saving”) my heart away.  I don’t remember exactly when I started, but I do remember how.  A friend just mentioned, “You can use it to promote your blog” and I was sold.  I have more than 10 “Boards” and more pins than I care to mention, but the one thing I don’t have is justification.  What was the point of finding these things online and tagging them to then show up online in another form?  Why was I not doing anything with the Pinteresting findings (oh yes, I plan to wear that word out).  Well after months and months and months of saying I was going to do it, I decided to really make an effort to actually put my pins to use and, of course, without a doubt, my favorite board is Baked Goods That Inspire.  To be fair, though, I have made use of quite a few of my pins, but I barely scratched the surface.  So here is the challenge I set for myself:   for every week for the remainder of 2017, 35 weeks to be exact, I will attempt to bake one item from my board.  From the easiest pins to the items that I am pretty sure I pinned for visual inspiration aka something I knew I could never ever bake (this should be fun).  I plan to go through the ups, the downs, and anything learned along the way.  I hope you will join me on this adventure with all the laughing, crying, and eating that will inevitably ensue this ambitious undertaking.

For my first week (please note I got sick so I am a week behind posting but I promise I made these last Saturday), I started with Caramel Pecan Carrot Cupcakes.  Oh yes, start drooling now.  You will likely note that most of my 35 are cupcakes, but I am really trying to be daring.  Cupcakes are so perfect, they are the new black.  I mean, they have been upgraded from kids parties to an elegant display at weddings.  And what, I say what, could be better than a carrot cake in cupcake form?

fb9002a3e3db9f7cdc5a4be93ad9f2fb

The image above that was capture via my pin made it all the more appealing.  The timing of my first week was perfect, because it coincided with my friend, Tana’s birthday.  I followed the recipe exactly except I have always refused to use premade caramel and after you make your own, you will as well.  It is so easy.  Here are a couple of recipes I like to use:

http://www.simplyrecipes.com/recipes/caramel_sauce/

http://www.epicurious.com/recipes/food/views/caramel-sauce-105889

This time I was so tired and in a hurry, as usual, I just threw ingredients into a pot.  Now let’s get into the tips I used and the few things I learned doing research as I am so trying to improve on my cupcake.   They often end up dense. You know, how it stays in your throat a tad bit longer than you’d like forcing you to need liquid to go with it.

  1.  Remember to bring your ingredients (incl. egg and butter) to room temperature for even bakingIMG_7566
  2. I use a 1/4 measuring cup to scoop up the batter to get even cupcakes.  Everyone has their own ideas from cookie scoop to weighing on a scale (I roll my eyes at that one)
  3. When using batters with fruit or additions that have water in them, add them last when you are ready to go right into the tin.  If it sits, you’ll add water to the batter.IMG_7561
  4. Spray the surface of the pan with non-stick spray for those pesky muffin tops that may spill outside of the cupcake paper.
  5. I only partially used this one, for batters with a lot of filling, fill all cups half way and then go back and fill the rest.  The is designed to eliminate the fact that by the time you get to the last cupcakes, all the good stuff is gone.IMG_7569
  6. Don’t leave the area – I like to try to do too much and ended up over-roasting aka burning the first batch of pecans.  Yes, I threw away a million dollars.  That may be an exaggeration, but nuts are expensive!  (Costco does have the best pricing).IMG_7560
  7. For frosting, put your bag into the tallest cup/vase you can find and insert the bag into the vase.  Fold the ends of the bag over the edges of the cup/vase and you have a quick and mess free way of filling your bag.IMG_7574
  8. For the whirly style frost I did hear, I used Wilton #1M and you put heavy pressure while squeezing and swirling around the top and slowly pull up.  Yeah, that makes sense.  Don’t worry, you can youtube it.IMG_7576IMG_7578

I had also read that you have to find the right recipe.  I initially scoffed at that one thinking, “if you are a good baker/cook, you should be able to make anything”, but after making this recipe I see.  I think maybe some recipes are not designed correctly.  Oh yes, the internet tricks us (gasp!).  I have followed recipes and have been like ew, but this one turned out amazing!

IMG_7580

I followed the recipe and didn’t deviate beyond the caramel and it was heavenly.  Oh and I used dried dates instead of raisins because raisins look like grapes that have gone bad and been poisoned.  I hate raisins! Sorry, I just am not a raisin kind of girl.  The texture, the flavor, everything was fantastic!  You have got to try this one!  I would definitely say my first week ended with a success and a very happy birthday girl.