My Little Dinosaur Turns Five

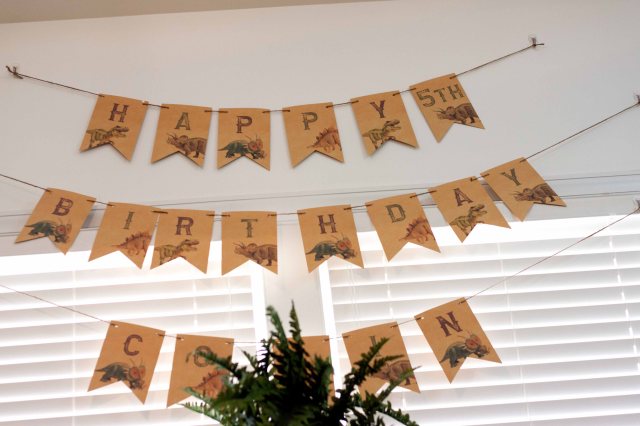
Submarine, Troll Hunters, Nijago….Oh my!  Those are just 3 of the one billion birthday ideas my soon to be five year went through until finally landing on dinosaur theme and by landed on, I mean I had to cut him off from making another change.

The bonus of his final selection is that everyone and their mama or son or even daughter loves a good dinosaur birthday.  There was no shortage of Pinteresting ideas splattered all over the internet so it will come as no surprise that his birthday was just a mock up of my Pinterest board.  I am pretty sure the only unique idea for the party was the enchilada casserole I prepared for the parents.

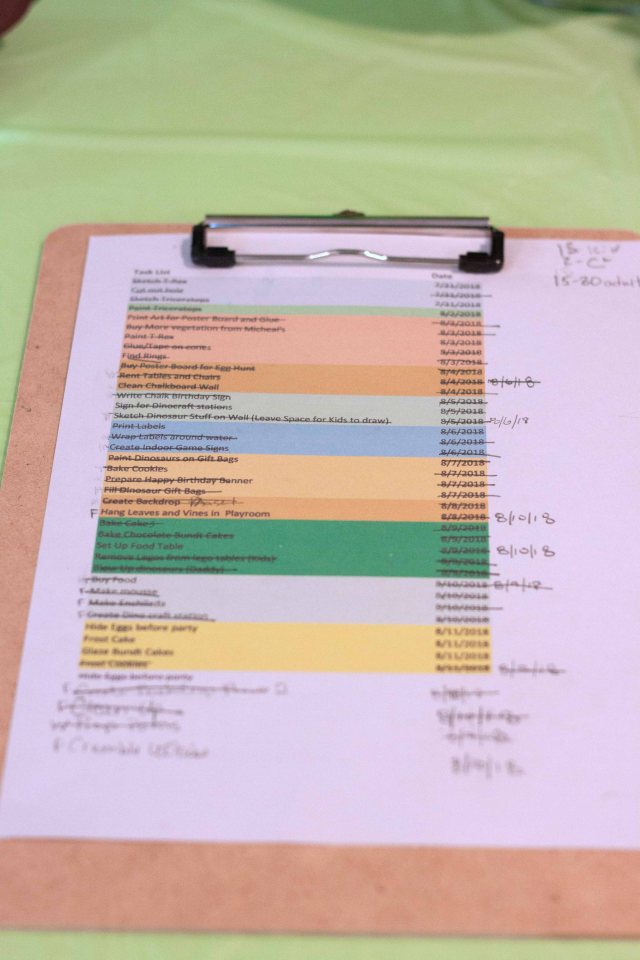
This event, I’d have to say, was my most successful to date and I have to thank my sheer determination and Microsoft Excel.  For every party I have ever hosted, I am usually still finishing up when people arrive and, more often than not, not even changed into hostess presentable clothing.  However, this time I was not only dressed, there was even make-up.  Can you believe it?!

I started off, of course with my usual plan to prep baked goods 2-3 days before the event.  If you don’t know about this, you better ask somebody.  Like seriously, ask a baker.  Baking ahead and freezing is a Godsend and the baked goods  still taste wonderful on party day.

This little handy dandy project is something I learned from YouTube and my new obsession with learning about baking.  Turns out, you don’t have to let your cakes form and dome.  You can put this make shift cover over the pan and save yourself time and a sample of your treat.  OK, that last part is the downside of this method (wet a long piece of paper towel and place over foil, fold the foil over the paper towel so the towel is not exposed and wrap it around the cake pan).


Now it wouldn’t be me if I wasn’t being honest, my cake was a bit sunken in the center.  I attribute it to the thickness of my wrap.  I think I went a bit far.  I am willing to give it one more try and see if I can get an evening baked cake.

IMG_7625

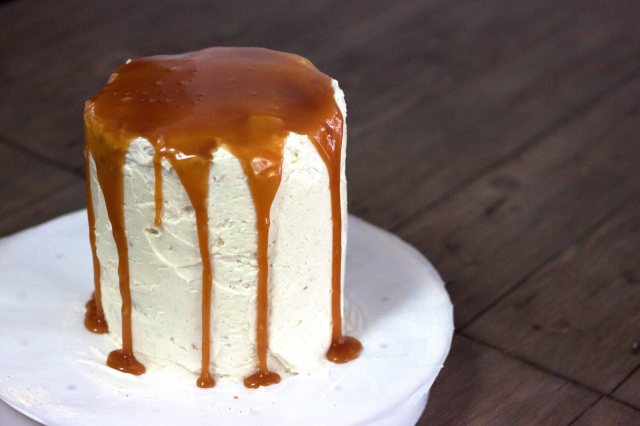
Below is the finished product.

IMG_7628

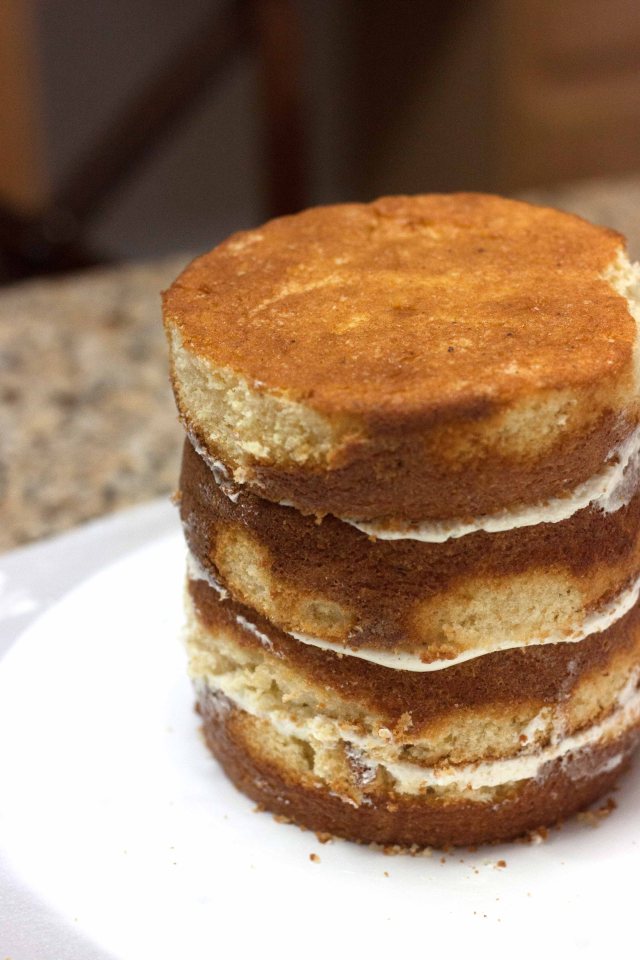
When I tried it with the second cake, I saw the same phenomenon happening so I pulled off the foil wrap, but it was too late, I lost the center.  Never fear, I worked with it.

Despite chocolate not being my favorite, this recipe was phenomenal.  The best part, the freezing helped significantly.  I was able to flip the cake upside down and because it was still frozen it was easy to spread the frosting and the ganache handled like magic.  The cake got rave reviews so this is definitely going in the books for a chocolate go to.  Should we be surprised though?  It did come from Ina after all.

IMG_7633

IMG_7635

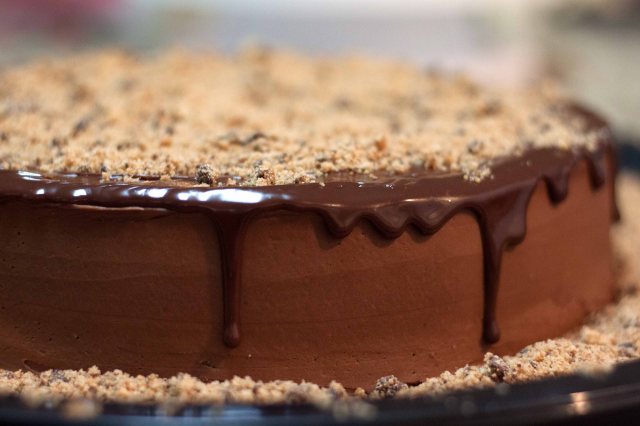
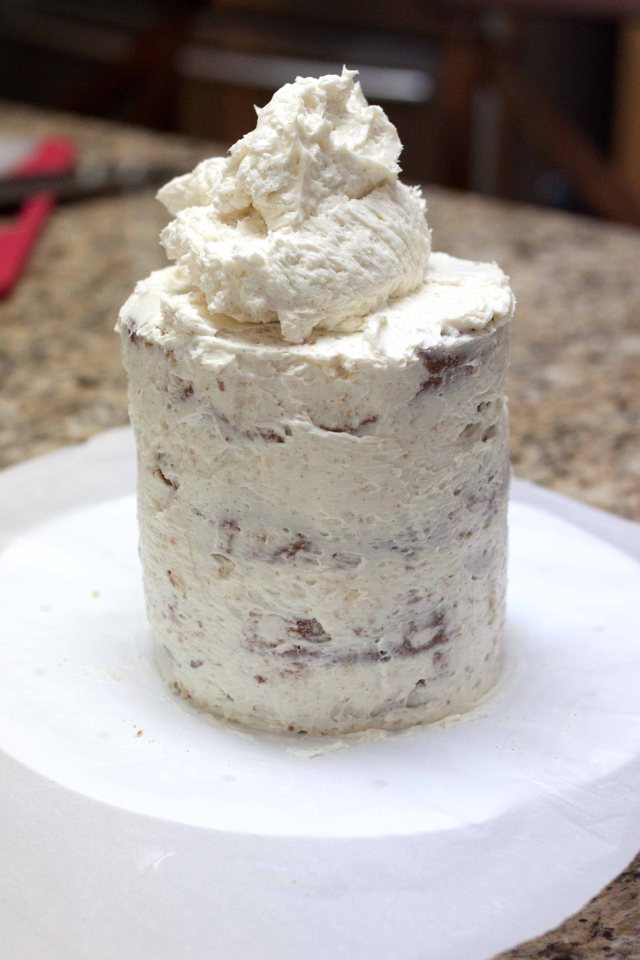
The chocolate cake turned out so beautiful, I almost did not want to continue on to the overly ambitious dinosaur themed cake for which I had intended to use this part of the cake.

IMG_7644

The top layer is the poinsettia cake that I made last year for a cake tasting party with an addition of food coloring.  I wanted to design a dinosaur landscape type cake, but due to the softness of the buttercream frosting and the incorrect piping tip the grass was not too clear.  However, I am sure the point came across.  Especially with the chocolate bundt volcano cake at the top.  Interest three dinosaur toys and no one is the wiser.

IMG_7732

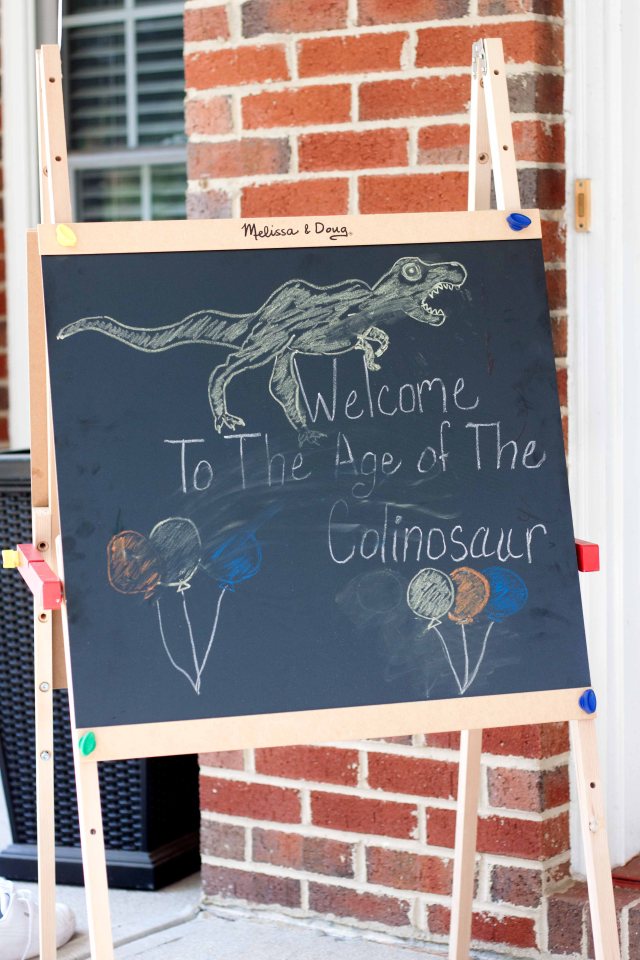
If you have followed my events, you know I am obsessed with chalkboards.  Don’t ask why, just know that I am.  This is one of only two for this event, but it was the first piece to greet guests at the door.  Unfortunately I didn’t remember to take this picture until after the party so the smears are just a reminder that kids will be kids.

Drawing didn’t stop there, I was in a space for this event and busted out my art skills…too bad art is so challenging for me, it apparently masks my ability to spell.

IMG_7687

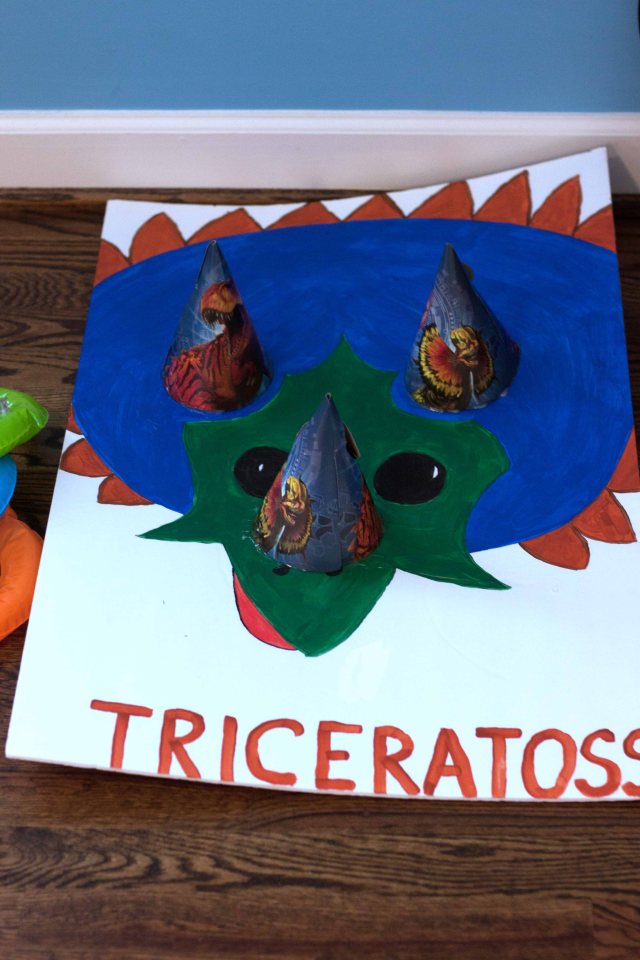
My prize pony for this event is this gem, I sketched and painted free hand for a fun bean bag toss game

IMG_7680

IMG_7688

The triceratoss game was funny, especially since the only party hats I could find were from Jurassic World.

IMG_7678

Note to parents, free play is all you ever really need.  It was like pulling teeth to get kids to play structured games.

Decorating for this was pretty fun, I mainly was going for dinosaurs in their natural habitat type of theme so thanks to Amazon, Oriental training company, and Micheal’s, I was able to create a very green event.

IMG_7675

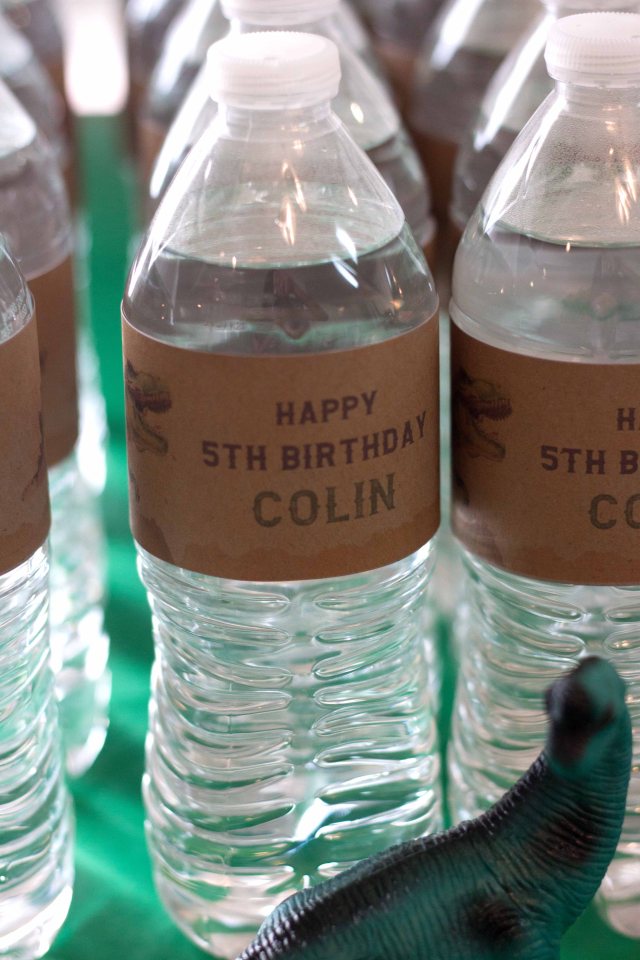
I ordered cute labels from Etsy, OMG they are my favorite go to for awesome label templates.  I printed everything on natural color cardstock from Michael’s to give it that earthy feel.

IMG_7664

IMG_7668

IMG_7696

IMG_7693

IMG_7676

The template package even came with an awesome template for the birthday sign.  This is also cardstock.

IMG_7672

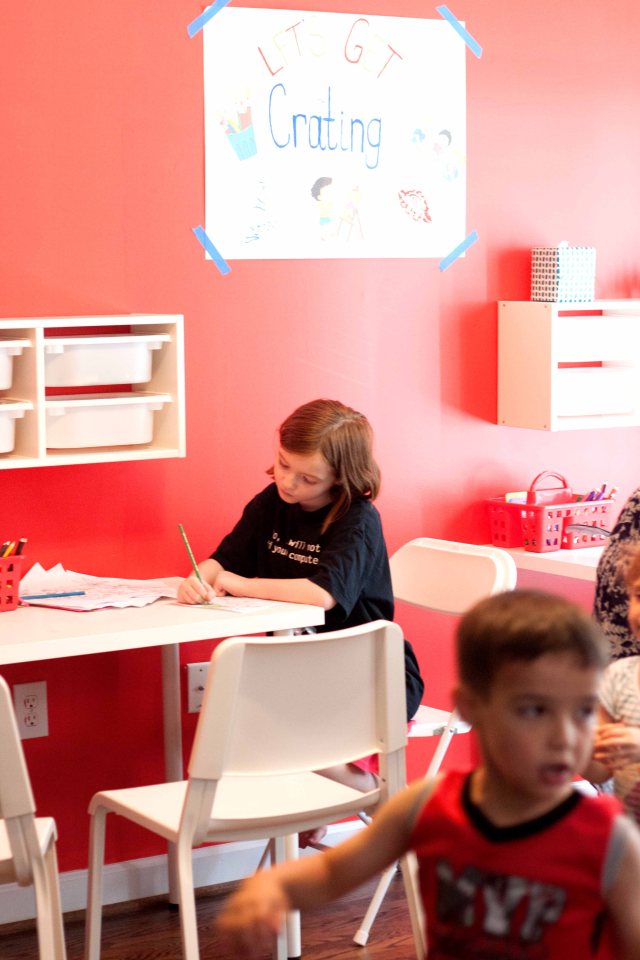
I staged the play area in the playroom which also has a chalkboard wall…insert chalkboard #2.  The kids had a ball with this one.

IMG_7683

The craft table was a hit too.

IMG_7690

To guide kids to the playroom, I placed these cool footprint stickers on the floor.  I think they are from Oriental Trading Co., but it could be Amazon.

IMG_7738

To no surprise, the dessert table stole the show.  The streamers were actually up for 3 days before the party.  I was super serious about completing this time around.  Even the table was up complete with Dollar Tree table cover.

IMG_7647

IMG_7648

These dinosaur cookies are everything and took everything to prepare.  Thank goodness my husband suggested using this special syringe I had on hand because otherwise, this would not have happened.  The cutter is so cool and can be found on Amazon.

IMG_7659IMG_7660IMG_7661

IMG_7653IMG_7650IMG_7657

These cupcakes are where I give myself a hearty pat on the back.  At 5:30 am when I was up in the kitchen after only 3 hours of sleep, I realized I had a lot of time and decided to mentally plan for making a quick batch of cupcakes as I felt like not only I did not have enough desserts for the kids and the parent, the current desserts were heavy on the chocolate.  Well time went by and I found time and literally squeezed in  some vanilla cupcakes and used left over frosting from the green cake.  I totally think I am ready for one of those timed cooking shows.

IMG_7649

The gift bags were fun to prepare, but the plan to fill them slightly backfired in that I expected them to be filled as the party was in progress.  The kids did a dinosaur egg hunt and even were able to put in a dinosaur for which they adopted (sadly did not get a picture and it was such a cute steal from Pinterest), but I forgot to have them get candy and there weren’t enough desserts to take home.

IMG_7772

The bags did look cute sitting on the table though.

IMG_7710IMG_7711IMG_7708

My son and all his friends had a ball and the food and dessert got rave reviews, most importantly, I finished everything and it all due to this special little list.

IMG_7747


A Little Something For Easter

Prompted by a co-worker’s exclamation that she was inviting her brothers and their families over for an Easter dinner, I decided to throw a small Easter gathering for my kids and a couple of their friends.  I mean, I have never done an Easter themed party and when I say Easter themed, I mean the commercialized version of the holiday (I am so going to get it for that) so why not celebrate in true SPD style.

IMG_4795

IMG_4752

IMG_4753

IMG_4743

First I must say, I have turned over a new leaf.  Call it age.  Call it finally learning from my experiences, but whatever it is I have finally come to terms that I cannot do it all.  With that said, I pushed it a bit but I really did keep this  one (my kind of) simple.  Party time was strategically set at 2:00 pm to 4:00 pm;  well enough after lunch to start twitching for some food  and early enough to not be craving dinner just yet so I would only need to have snacks purchased from the store.  I know, gasp!  A fruit platter (I recommend homemade as it cuts down the cost by at least a third especially if you have bargain stores like Aldi), a cheese and cracker platter, and some veggies.  The cone bags filled with Trader Joe’s “Cheetos are my favorite snack for the kids since they use a type of turmeric too give that orangish color so their are no artificial flavors.  Now before you start pondering whether or not I have gone off my rocker, I absolutely made sure there was plenty of homemade dessert.  Oh and the milk bunnies idea I found on…you guessed it….Pinterest!

Before I go into the details of the desserts as that is all I really want to talk about, I will say I got a little creative with the activities.  The kids painted eggs with paint (because I was not in the mood to deal with dye) and boy were the kids serious about their masterpieces.  I also hosted an Easter egg hunt which was was outfitted with cute pinwheels I made using gorgeous card stock purchased on sale at Micheal’s.  Side note:  this works best with the very thick stock.  I used the thin ones because they had the most beautiful patterns but the wind proved to be a tough match.

IMG_4787

Now back to dessert, my proudest was the Lemon Cheese Layer Cake which I later renamed 4 Layer Lemon-Orange Citrus cake as there is nothing cheese about this cake.  Even Southern Living, from which the recipe was obtained, mentioned the name was a bit misleading.  The layers are filled with a lemon curd, which, turns out is way easier to make than one would think.  Then the sides are smothered in a buttercream laced with orange zest.  This had to be the most well assembled cake I have ever prepared thanks to some YouTube tips.  I chose to top it off with a beautiful yellow tulip in which  I secretly wrapped the stem in plastic before I inserted it into the cake so the yucky flower germs wouldn’t touch it and also to retain the moisture.  I will definitely make this one again.

IMG_4781

The rice crispie treat nests were so cute.  I opted for the brown buttered version of the recipe w/ a hint of vanilla bean paste to kick it up a notch.  The little chocolate eggs add just the perfect look.

IMG_4789

IMG_4761

The cupcakes were a simple white cake and standard buttercream frosting, but you can’t tell me the sprinkles and cute bunny toppers found in line at Home Goods do not put them over the top.

IMG_4817

IMG_4814

All in All I was so happy that I got my creative juices flowing again and finally got a moment to take pictures to share.  I am not even going to apologize for the fact that this is my first post in like months because it just shows how life can take over.  I am not one of those moms that has it together all of the time.  I have two young boys, a demanding full time job and all the stuff in between so adding in regular blog posts just won’t happen,  But every once in a blue moon I can muster up the strength to share a little gem.

Side Note: my photography skills have diminished and the lighting was not consistent so neither were my photos.  But I hope  you still enjoyed it.

IMG_4797

Cleaning & Cocktails


IMG_1729

I know! I know! I have been M.I.A and what happened to my 35 week challenge you ask… life!  Life happened and there was nothing I could do about it but accept that I had, once again, challenged myself to an unattainable level.  I will say, however, with the exception of a couple of weeks, I have been baking up a storm.  The major challenge has been to transfer my pictures to the desktop and edit them and then proceed to write up a reader worty blog post.  I assure you, I will get those delicious, Pinterest board delicacies on my post but for now I will leave you with a quick recap of my latest endeavor.

After begrudgingly attending a friends Norwex party, I found myself walking back to my car with a baggy of freebies in my hand, an order receipt in my pocket, and contemplation in my mind as I had purchased products and volunteered to host a party.  The clever consultant, Jennifer, both lured me with her excellent presentation and played to my hosting obsession.  Fast Forward to a few days after  my friend’s party and I  not only had a theme for my party but an catchy title as thought up by Jennifer The Consultant (Thanks Jen…I didn’t even ask her if I could call her that)….”Cleaning & Cocktails”.  Oh be still my hosting heart.

IMG_1719

Unfortunately in the middle of planning, I had a life situation happen that distracted me and took me out of town away from my children for the first time.  I actually ended up returning only four days from hosting day.  So you know what that meant, last minute shopping and running behind.

IMG_1734

On the day of the party, I was really limited in my time.  I was fortunate enough to have baked my cupcakes two days in advance and tossed them in the freezer (I can never thank the baker who posted this tip in a thread).  Anyway, I will tell you one thing that has come out of all of this baking and cooking, I am getting pretty fast.  I think I am ready for one of those speed baking cooking shows.  In the morning, with my kids running circles around me, I was able to prepare a mint chocolate mousse (post to follow….at some point), mint flavored whipped cream (homemade), tart crust and shrimp bruschetta topping.

IMG_1725

Since I had little decorating time, I chose to buy four gold balloons and instead of wrapping the gift boxes containing the most amazing coconut cupcakes I have ever tasted (oh yes I am boasting about something I made and you will be as well should you try it out) with gold ribbon I had purchased, I used the gold marker with which I decorated the mirror in the drink bar area to write a simple “Thank you!” and it looked pretty cute.

IMG_1727

I was so behind, I was plating up dishes when guests arrived so the pictures are few and poorer quality than my usual and I even put Jennifer The Consultant to work on prepping the caramelized onion tartlets.  She did an amazing job by the way!

IMG_1737

IMG_1736

In the end, the turn out was enough to make me smile and the food had everyone including myself eye rolling.  You know what I mean…when the only response you can muster when savoring every bite of a delicious piece of food is just a slow roll of the eye.

IMG_1723

Top all of that off with yummy wine and Moscow mules and I was a happy girl.  I had almost forgotten someone was selling something in the middle of all of this.

IMG_1733

A special thank you to all my guests and a special special thank you for your purchases.  I made it to some freebies!  Who could ask for anything more!!!

IMG_1728

35 Weeks of “Pinteresting” Baking: Week 2 – Brown Butter Cake with Vanilla Bean Icing and Salted Caramel

The first thing I have to confess is that, due to my relentless cold, I am behind in posting, but I assure you I am baking in real time.  This cake was made this past Sunday.  I was, once again, able to find inspiration for my baking and this time it was my mother in-law’s birthday.  And what would be more appropriate for a birthday than a cake.  Aside from the gorgeous image of the cake, the words “brown butter” will get me every time.  OMG, I just wiped drool from my mouth.  Brown butter is the process of taking butter to an unimaginable level.  Imagine butter, now image having butter in heaven and you will get a glimpse of what it is to have browned butter.  If you think I am being dramatic, try it.  It attacks all of the major senses involved in eating.  The smell is mind numbing.  It is a cross between roasted nuts and caramel, a smoked caramel if you will.  I also, happen to love the look as well.  It is just a beautiful caramel color and it taste so rich.  As you can see, I can write a post on just browned butter alone, but I digress.  Aside from the naming of this delectable dessert, the beautifully crisp image that I chose to “pin” on my “wall” is what grabbed me initially.  I loved the smooth, seamless frosting underneath the glossy caramel drizzle with tiny little vanilla bean speckles can be seen on the sides of this adorable cylindrical masterpiece. The image below is from the original recipe and the one I chose to “pin”.

cake

The first task at hand was to get the right sized cake pans.  Since I am the absolute worst at visioning size of an object based on a documented measurements, I was shocked when I went to the store and found the four 6″ cake pans.  They were so tiny.  Anyway, I can now I can make cute little cakes so it was all worth it.

If I am being honest, though this was only Week 2, it was already a bit of a flop.  I started off looking good, I promise.

IMG_7777

IMG_7786

As you can see, I masterfully browned the butter (I like to leave in the crust if it will not impact the look) as I have made several recipes with browned butter at this point and I even mentally created an updated version of one of my favorite cookies which I plan to make at the end of the month.  Don’t worry even though it is not part of the 35 week baking, I will still post.  After that, things slowly started to go south, from the forgetting to put in the eggs until after the dry ingredients had been mixed in to the, well, you’ll see later.

Despite the major fails, I do have some tips for this one.

IMG_7794

IMG_7796

IMG_7795

  1.  I am a master at preparing a cake pan.  Though I grew up making boxed cakes with my mom (which is funny because we never ate processed food for meals), I learned how to properly and thoroughly grease a cake pan as if I was making something from scratch.
    • Put shortening on a paper towel and grease the pan ensuring that you cover every inch including the creases
    • Then take a little bit of flour and dump it in the center
    • Work the flour around the cake pan like you are trying to keep a marble from falling off the edge of a tray (I hope that makes sense)
    • Finally rotate the pan like a wheel so that you get the walls of the pan and tap it to remove any excess flour (maybe I will do a video some day).

IMG_7823

Here is the picture of the finished cake out of the pan (above).  Mic drop.

IMG_7847

IMG_7849

  1.  I do know if you are making a layered cake, you level off the top with a knife.  The cake should probably be really cooled at this point so you don’t knock off the edges of the cake like I did.  You are also supposed to  do something similar on the sides, but clearly I went too far.IMG_7845IMG_7846
  2. I saw this online and it worked like a charm.  For the filling layer, use a pastry bag and any circular tip to dispense and then lightly spread it with a flat spatula (any smoothing tool).  That made this step a snap.IMG_7875
  3. Do not, I mean do not substitute vanilla extract for vanilla bean but you can substitute it with vanilla bean paste which is also also quite pricey, but the unlike  billion dollars for the actual bean, it’s a much easier pill to swallow.  The little bean speckles add to the visual charm of the dessert and I believe it is more concentrated as well.  I don’t know, it just has a different flavor that is worth trying.  My husband found this one at Harris Teeter for $10.  But he heard that Trader Joe’s has the same one during the holidays for $4 so be on the lookout for a crazy lady collecting every single tube in November.

Now that is all the tips I am giving because I botched the other tips and ended up mutilating the cake.  Yes, a cake was hurt while filming this process.  But none was wasted!  The kids, my hubby and I gobbled up every little crumb that did not make it to the finale.

There were also a couple of steps I skipped as I was in a rush to get the cake to the birthday girl.  When you initially frost a cake, it is called the “crumb layer”.  Apparently this is a thin layer of frosting that is applied to the cake in order to “catch” the crumbs that magically appear.  This recipe went a step further and had you chill the cake after the crumb layer for 30 minutes.  I think this would have really locked in those crumbs.  This is where I almost lost the cake, again likely due to it not being cooled enough.  I actually started breaking off cake.  After a while I just pretended like I was working on dry wall and the frosting was my caulk.  I actually saved it…well at this step.

IMG_7851

IMG_7852

IMG_7853

Once I added the frosting, it started going south and it took forever just to get this look.  My final thoughts after making this cake are, one, I absolutely do not like butter frosting.  I said butter, not butter cream which has cream cheese in it.  I need more time and practice for making cakes as they are so much work.  I also dare anyone to ever ask me to make a cake because I will karate chop them.  It is so much work and you would have to charge a lot to make it worth it.

It was pretty good, but the most important part is the birthday girl loved it!


Here is the image on my Pinterest wall.

IMG_7860

IMG_7870

See, just like the original.  I bet you can’t tell which one is mine.

Christmas Exploded In My House and It’s Not As Expensive As You Think

img_4671


At this point the Christmas decorations are pretty much done and unless I manage to create some magical wormhole where I am able to freeze time and just sit and create some additional holiday designs to add to my house, I am very unlikely to add anything else.  But that’s o.k. because I walk through my house every day like a kid in an FAO Schwartz inspired candy store (does that exist?).  It is so well deserved because this was a year in the making.  Oh yes, I had to wait a whole year to finally get my Christmas explosion.

img_4676

Christmas 2015 I moped through my rusty box of decorations that had been purchased through the years at the dollar store or some scrap bin and I didn’t spend a dime.  O.k. well maybe a dime.  I was uninspired and unenthused, but it was all for good reason.  I knew as soon as the holiday was over and those 60%+ off signs went up at my favorite go to stores (Michael’s, Target), I would knock over grannies to get what I want.  And that is exactly what I did.  No, I didn’t really knock over grannies but I huddled over my cart like a little old lady as I sped through aisles of decor from Christmas past.  I mean I was buying things I never thought I could because there was no way in hell I was spending some of those crazy prices on ornaments or garland, but at 70% off it was more my budget.

img_4673

img_4688

Let me just tell you, this is no sprint.  You have to be willing to go back for a week or more as they drop the prices each week.  I got things for as low as 80% off.  I was even able to purchase decor from Kirkland’s.  I am telling you, it was so worth it to wait.  I mean my house looks like I am one of those, no offense, crazy people that spend a fortune on Christmas decor and I spent only slightly more or the same as if I went shopping in the bargain bin at a discount store.

img_4629


As you can see my Rustic mind is still going strong.  I wanted to stick with that style so I have a lot of green and burlap.  And do not forget about the chalkboard.  I think I ended up getting those mini trees for $1 each from Target once they went down to $1.  Oh yeah, I recall now.  I took every single tree on the shelf and was walking away and a woman freaked out (she was like actually fussing) because she must have seen them before I got there.  I totally hid and ran off with my steal.  It was hilarious.

img_4630

img_4564

So, if you want your home to look like Santa’s workshop but don’t have a basket ball wives’ budget just hold strong, stick with your minimalist Christmas decor this year and attack those shelves after the holiday and in one year, with patience, you will have the holiday home of your dreams.

img_4682

img_4579

Enter a caption

img_4670

Enter a caption


img_4680

I am so proud of this tree.  It is pretty full for my standards and the ornaments were cheap pricing but not cheap quality.

img_4645

img_4637

img_4635

img_4649

img_4695

An Old Fashioned Treat Gets a homemade maker-over

In an attempt to have one last get together for my son and his kindergarten mates before they transition to 1st grade.  I wanted to just do a little something with no bells and whistles.  No days and days of little sleep trying to execute some insane design my meddling brain created.  Just playing with water in the backyard or whatever they find around the house, pizza that will be delivered and homemade ice cream sandwiches.

I tried sooooooooo hard to be simple, but I mean, there had to be multiple flavors of ice cream and there HAD to be different cookie options so that there can be different sandwich combinations and how could they possible know what to pick without a menu and what kind of menu would it be if it wasn’t a chalkboard menu and how would they know it was a menu if I didn’t give it a title.  That is pretty much how my brain works and why things constantly spiral out of control.  Oh well, what’s done is done.  I kept it as simple as I am capable of keeping it and the kids had a blast.

Oh don’t worry, I will not conclude this post without talking about the treats that inspired this whole thing.

I am quite particular with the quality of food that my little monsters consume (until I am exhausted and you hear “Welcome to McDonald’s, may I take your order”) so if I allow ice cream in the house, it is only with a label that says cream, sugar, and maybe 2 or 3 more ingredients that I am able to pronounce and don’t recognize from a reagent label at work.  Harris Teeter was having a buy 2 get 3 free on Turkey Hill (don’t ask me, it’s a brand they carry here in NC) so I thought, this is totally a sign that ice cream sandwiches are the way to go.  Next was deciding on which cookies, but before I even went there I had a matter of business to resolve.  My cookies have not been performing as well as I would like so I Googled and found some awesome tips that had my cookies looking and feeling like something from a professional bakery (taste has never been an issue).  Here are the tips:

  1.  All ingredients must be at room temperature (I have shared that one before)
  2. Beat butter and sugar for 3 – 5 minutes.  This is for real.  It gets that air inside so you have nice plump, fluffy cookies.
  3. Rotate you pans midway through cooking (change racks as applicable but also a 180°)
  4. Parchment paper!  – This is the best and most important tip I have ever used.  It made clean up a sinch.  Helped the cookies have a gorgeous color on the bottom, but also helped speed up my process as you are able to set cookies up on the parchment paper while one/two batches are in the oven!

IMG_2189

IMG_2137

IMG_2146

The cookies turned out the best I ever made.  I chose my go to chocolate chip and oatmeal cookies although no one chose that one, sugar cookies, and brown butter cinnamon with white chocolate chip.  You can see the combinations on the menu.

IMG_2157

IMG_2148

The menu was such a fun touch, the kids were so excited and perplexed trying to decide which to choose.  One of the moms who stayed took orders and it was really like an Ice Cream Shoppe (what the h is a shoppe?).  I am pretty sure I enjoyed it the most as I, for a brief moment, got to experience having my own bakery without leaving my own home and the kids got a nice end to their summer break which I hope goes in their history books.

IMG_2179

My Something-Is-Better-Than-Nothing Christmas Decoration

Of course I had some inclination to decorate this Christmas.  I mean, who doesn’t love the sparkly lights or shiny ornaments dangling from a deliciously fresh smelling pine tree.  But this year, it was going to be a little different since we are just in a transitional locale and more specifically we plan to, once again, be homeowners just before the most exciting holiday of the year (Thanksgiving is a close second).  So the thought of going all out on Christmas decor seemed pointless.  To throw an even bigger wrench in my already premeditated attempt to do half a@s Christmas decorations, I got sick two days before Thanksgiving.  I chose to ignore my aching body or the hacking cough every two seconds and still cooked, shopped, and traveled so by the time Thanksgiving was over and my son kept begging to decorate, the something-is-better-than-nothing Christmas decorations were born.  I grabbed the most visible boxes that contained holiday decorations and literally started throwing things in random places.  I mean, come on, I can be a perfectionist, but you have to draw the line some where (I am still coughing a week later).

IMG_5407-002

The one thing I am proud of is our “Christmas Tree”.  I knew we just didn’t have time to pick up a tree and it just seemed like too much work knowing we will be working on our new home (cross your fingers) during the holiday so I recalled the post on Apartment Therapy about alternative Christmas trees and remembered some were drawn on a wall so I thought why not.  This was probably one of the best Christmas ideas since I have had children.


IMG_5400-001

IMG_5399-001

I drew the tree and then let my four year old trace it with chalk.  It served as Christmas decorating with mommy and a writing skill builder.  He did so well!  We even put ornaments on it.

IMG_5429-001

IMG_5430-001

When all was done and I was looking around our apartment, all I could say was “something is better than nothing”.

No Babysitter, No Problem: Keeping Date Night Alive

IMG_1511-002


There was a time, long ago….o.k. only four years, but it seems like an eternity when you are a parent.  Anyway, there was a time when my boyfriend (now my husband) or I would say hey let’s go out and the only consideration was where to go.  Fast forward to the present and those people are but a mere fantasy.  Now it is, who will watch the kids?  Are the kids sick?  What time will they go to sleep so we can make a break for it?  Or, ugh, I am too tired to get all dressed up and battle the crowds.  We have recently added another wrench in our dating plans by relocating to an area where we have do not have a single family member.  We no longer have to ask the question who will watch the kids, because we already know the answer is “no one”.  Yet instead of being defeated, because I will say it is so important for parents to get a moment where you feel like adults again and more importantly where you get a chance to be reminded of why you married the person, we decided to have date night at home.

For my husband and I, being able to enjoy a glass or two (or three?) and turn on a movie after the kids go to sleep is priceless and aside from the wine and movie, is near free.  We often like to spice it up with margaritas with some chips and salsa to remind us of our happy hour days at El Toritos. I recognize to the lucky few that can afford to get the best help or have live-in parents or just a trustworthy person at the tip of your fingers (literally since you have to use your fingers to call them) this may seem like a yawn fest or something you do when you become a retiree, but I will tell you it makes you feel like a twentysomething again.  The best part is you can be in something extremely comfortable and your kids are right there across the hall, upstairs, downstairs.  Anything you and your battlefield partner (aka child rearing partner) can think of, you can do at home for date night.  It has often surpassed the option of going out some days.  So for those of you stuck without a baby sitter, there is still hope.

Brunch To Go

IMG_8323-001

If you haven’t guessed it by now, I am a foodie.  I know that eating is supposed to just be for sustenance, but come on, it is just too good to eat only for one’s survival.  We eat it to celebrate, to compensate, and to appreciate.  I am aware it can be a bad habit, but this time I say oh well. Oh and I also use it as a gift.  I believe it is one of the cheapest ways to make someone really feel  special and excited so when I was digging around in my brain trying to figure out something nice to do for my pregnant cousin (with her second), it should come as no surprise that I thought of food.  This time I chose breakfast, but days before her breakfast gift, she notified me that she would be going in to work for a bit that morning.  Instead of cancelling completely, I decided to make her brunch, but to go.

IMG_8301-001

Baking sweets is probably my favorite form of cooking so of course, I started with this coffee cake recipe I had on my pinterest.  I was trying to be as cost effective as possible with this brunch idea so I swapped out the requested Amaretto, which I did not have in stock, with rum.  It still came out great, but the rum flavor was very strong despite needing to cook the cake for over an hour to compensate for a faulty oven.

IMG_8304-001

I first cut the cake in half so one half could stay at home with us to enjoy.  Then I cut slices of the remaining half and wrapped them up to go.

IMG_8311-001

Next up is the cherry tomato feta cheese quiche.  I don’t have a recipe listed because my exhaustion led me to freestyle the recipe.  I prepared a crust from scratch and blind baked it for 20 minutes.  The filling is egg, heavy cream, feta cheese, cherry tomatoes, and fresh basil.  You just mix it together in a bowl and pour into the crust.  Note from the picture the overflow of egg mix, this is what happens when you don’t use your pie weights.

IMG_8316-001It still came out delicious and was actually easy to remove from these tarlet springform pans.

IMG_8294-001

Next up was a delicious parfait.  I added each layer carefully and one at a time so that it can have that nice layered look.  I enlisted the help of my son since I stole  his granola cereal (it is just plain granola so no fancy cherry granola as the recipe lists) for the treat.

IMG_8300-001

  It was easy and looked so delicious when I was finished, I somehow had the strength to not devour the four that I made and give one to my son who, honestly, deserved it and my mother-in law.  The final two went into the basket.  In order to save time and money, I opted out of finding a clear plastic cup with a lid and just tightly covered the cups in plastic wrap and tied a plastic spoon to the front.

The final touch was to present it in a ready to travel picnic basket and add some fruit.  I have to say, I wanted this one for myself, but it was really nice to see my pregnant cousin opening that basket  with the biggest grin on her face.

IMG_8331-001

Last Minute Father’s Day Gift Ideas for The Budget Conscious

IMG_7799-001


For some reason, I find I am most driven when I wait until the last minute.  Holidays and celebrations are no different.  For those of you who find yourselves in the same position and can’t necessarily throw large sums of money at the situation (oh how that would be so much easier), I have compiled a list of some low cost and free things to do for that special man in you and your children’s lives.

Frame A Picture

Find the best picture that you have already taken of the hubby and the kids or just the kids and frame it.  A 5X7 picutre  (an ideal size for an office desk) at Costco is only $0.39 .  They have a fairly simple process for uploading and ordering your prints.  You can also check Wal-Mart, Walgreens, or your local photo center to shop for the best deals.  As for the frame, if you want to be really frugal but have a more posh look, shop at your local thrift store.  You can find something amazing easily under $5.

 Car Care Package

This idea is my favorite and is something I thought up after the 100th time my husband came home ravenous after sitting in SoCal (that’s Southern California) traffic.  For anyone who commutes in this area, this is a regular occurrence at any time that is not between the hours of 2:00 am and 5:00 am Monday thru Friday or after 9:00 am on the weekend.  Anyway,  this entails a box of goodies for that long ride home.  Now the contents, of course, will be custom for each dad.  Whether it’s sweets, chips, nuts, fruit, bags of tea, gum, mints, or a book on tape which can be rented from your local library to save money, stuff it all into a nice box labeled with something cute (e.g. “Gridlock Snackbox for Daddy”).  It is also a way to drive away that urge to pull off the freeway/highway and spend money at a fastfood drive thru.

Homemade Coupon Book

I know…I know…this one everyone knows and may seem childish or dated, but this could be one the kids could enjoy and could also be turned into an art project or activity.  You know I love a twopher.  If you are doing it yourself as the partner, you can get VERY creative and put your best foot forward in the design.  Computers can do a lot.  If you stick to carrying out the task, dads will really have fun with them.

Breakfast In Bed

Start his day off right and serve breakfast in bed before he even lifts a finger.  Here are some of my favorite go to recipes.  Oh and quick tip, start checking  your local grocery stores now for good deals or discounts on the fancier cuts of breakfast meat to help you create an extra special meal for that extra special dad.

French Toast Bake

Feta and Sundried Tomato Egg Sandwiches

Buttermilk Pancakes

For more breakfast recipes, you can view my Pinterest page, “Breakfast Breakfast Brunch”, under Kisha Lamonica.

Spoil Him Rotten With A Day Off

O.k., this one really is my favorite because if there is anything I love doing for other people, it is making them feel special.  I cannot think of a better way to make someone feel special than to spoil them.  Now I warn you, this one does not cost money per say, but if you have small children, it can be very labor intensive.  This means, you have to let him relax, you have to deal with the kids all on your own.  This gift is usually combined with some of the other gifts.  Don’t let him lift a finger…moms (wives), bite your tongue.  Remember we are focusing on the fact that he is a good dad.  After you make him breakfast, take the kids out for a bit so he can “Vegg” out.  A step further would be to rent a movie that you would not want to watch with him and let him watch it in peace while you and the kids go to a park or even visit grandpa.

These are just a few things I have been contemplating, I hope you all are able to give those dads a memorable day no matter what you choose to do.  Happy Father’s Day!!!